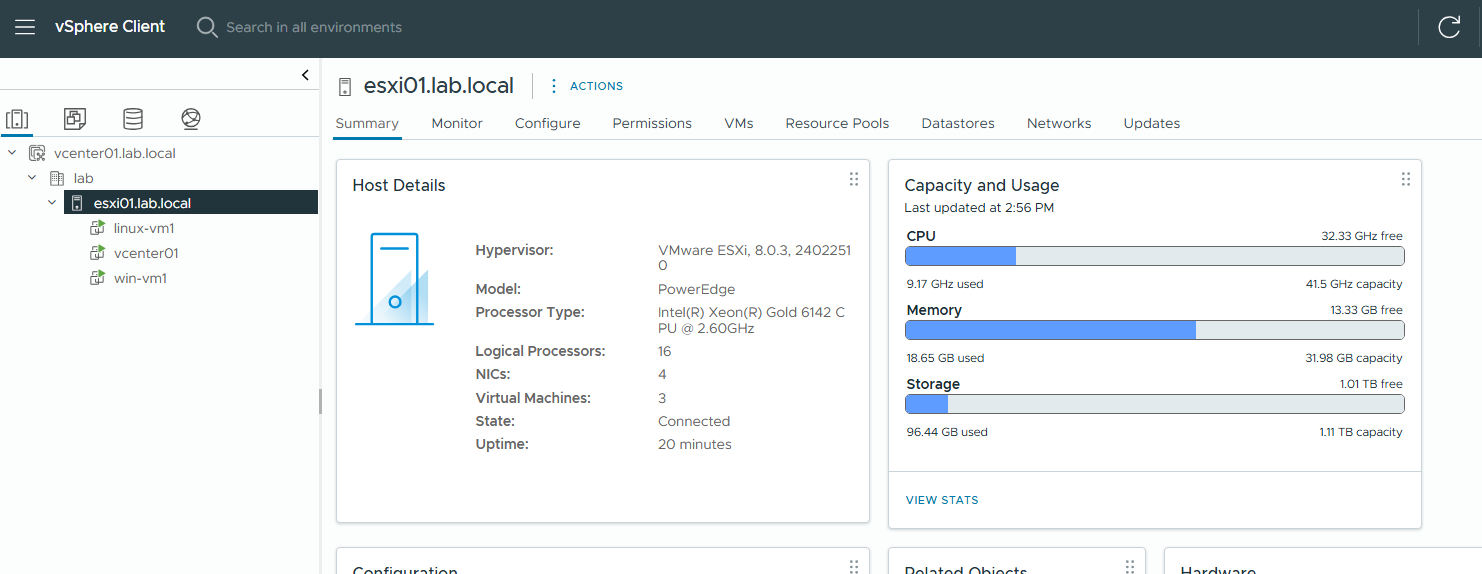
Part of experimenting with a different hypervisor is trying out that hypervisors built-in migration tools to bring VMs over from ESXi to the new hypervisor. In order to try that out in our lab we need to have a minimal vSphere environment stood up, so in this section I will walk through doing that.
The goal with this is to provide a very simple and minimal vSphere environment, so it will be a single ESXi host, local storage for the datastore, a single VDS, and a single vCenter. We will then deploy a simple Windows and Linux VM on ESXi that can be used for V2V migrations later.
Here is how the nested vSphere environment will look by the end of this post:
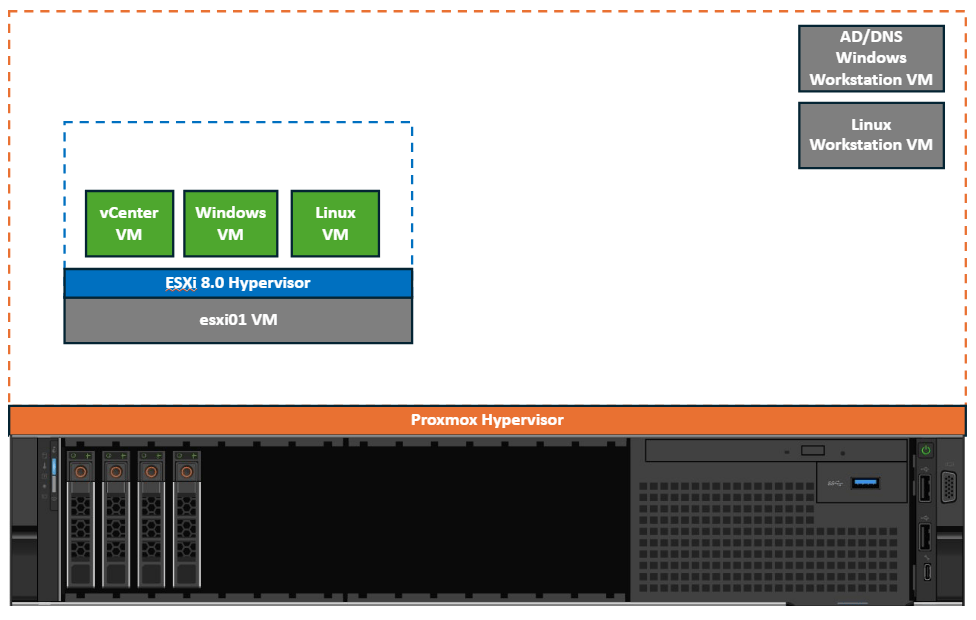
Virtual Machine Node Hardware Planning
The VM hardware for the nested ESXi host will look like this when we make the VM towards the end of the post:
| ESXi Node | CPU | Memory | Boot Drive | Data Drive | NIC Ports |
| 1 | 2x 16c | 64GB | 1x 240GB | 1x 1TB | 4x 10G |
VM Network Planning
I will be using the 4x 10G ports on each VM to mimic a physical server that has 2x dual port 10G NIC cards.
Two of the NIC ports will be placed into a vDS that will support the ESXi management network, the vMotion network, and Port Groups Virtual Machine traffic.
The other two 10G ports I will leave unconfigured for now/for future for if I decide to connect external storage later.
The VM networking layout will end up looking like this per node:
| Physical Port | ESXi Usage | VLAN Mapping |
| NIC Port 1 NIC Port 2 | vDS | 105 (ESXi management) 200 (vMotion) 300 (VM network) 400 (VM network |
| NIC Port 3 | Unused | Unused |
| NIC Port 4 | Unused | Unused |
Logical Network Planning
For the logical networking I will be assigning static IP addresses for ESXi Management and vMotion since we may want vMotion in future testing. The VM networks don’t need static IPs since the vNICs will be connected directly to those VLANs.
Here are the IP addresses I will be using for my nested ESXi host:
| ESXi Node | Management (105) | vMotion (200) |
| esxi01 | 192.168.105.124 | 192.168.200.124 |
We also need a vCenter IP address on the management network for our nested vCenter VM:
| vCenter VM | IP Address |
| vcenter01 | 192.168.105.8 |
DNS Entries
We also need to create DNS entries for the ESXi host and for vCenter:
| DNS Entry | IP Address | Usage |
| esxi01 | 192.168.105.124 | Node 1 Hostname |
| vcenter01 | 192.168.105.8 | vCenter hostname |
It is very important to get these DNS entries created before installation. On my Windows DNS server creating these looked like this:


Download ISO Files
You will need to use your Broadcom account to download the ESXi installation ISO and the vCenter installation ISO for 8.0 U3:
- Download vCenter Server patches and ISOs for latest releases
- Download latest ISOs and patches for vSphere ESXi
Since we are using native VMware drivers with Proxmox we don’t need a custom ISO, and we will be using a generic ESXi install ISO.
Once you have downloaded the ISOs upload the ESXi install ISO to your Proxmox host, mine will be stored in the data1 Directory.
Create VMs in Proxmox
Now that we have everything mapped out lets create the single VM on Proxmox that will become the esxi01 host. Right click on your Proxmox server and select Create VM to launch the Wizard:

In the General section I’m going to call my VM server esxi01 and I’m going to give it a tag of “esxi”:

In the OS section set the OS to Linux and provide the ESXi installer ISO file:

In the System section choose Q35 for the Machine, UEFI for the BIOS with the EFI disk on data1, VMware PVSCSI (IMPORTANT) as the SCSI Controller:

In the Disks section set the Bus to SATA (IMPORTANT), the storage to data1, give a size (I’m using 240G for all VM boot disks) and make sure to check SSD emulation and Discard:

Add a second SATA disk of 1T in size to be our local datastore, and make sure it is also SATA with SSD emulation and Discard checked:

In CPU give you VM however many vCPUs you want – I am going to start off with 16x vCPUs across two sockets for my ESXi host since I have many cores to work with. For this make sure to set the Type to Host (IMPORTANT) otherwise your nested ESXi host wont be able to run VMs on it:

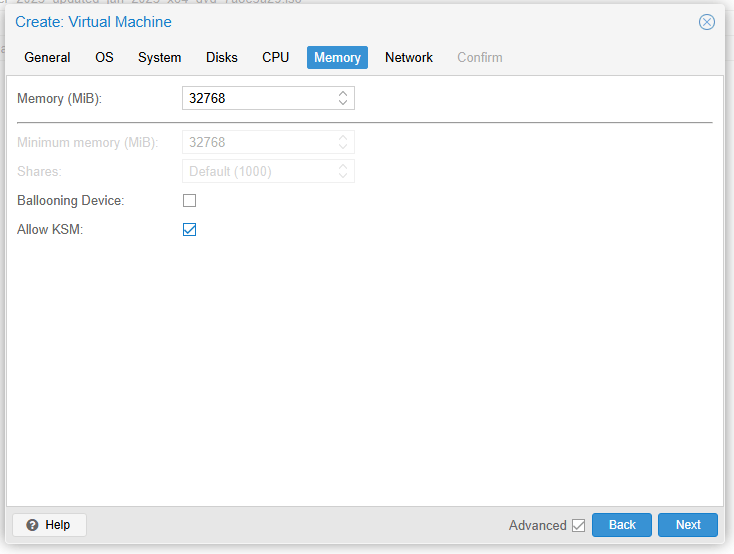
In the Memory section I am going to disable memory ballooning and give my VM 32GB:
In the Network section make sure to choose your 10G Linux Bridge. Since we will be creating a Virtual Distributed Switch and Port Groups inside the VM do not tag a VLAN here like you did with the previous Windows and Linux VMs. Also make sure to pick VMware vmxnet3 as the NIC Model or you wont be able to install ESXi:

After clicking finish go back into the VM settings and add three more NICs. It should look like this when you are done for the VM hardware:

Next navigate to Options and edit the SMBIOS settings:

This is where we can have our VM hardware pass along info to the GuestOS that makes it look a bit more like a physical server which is sometimes required depending on the hypervisor being nested. In my case I’m going to make it look like a PowerEdge R640 as the hardware identifier with a fake service tag:

Install ESXi
Go to the VM Console, start the VM, and boot from the ESXi installer:

Proceed to install ESXi like you normally would and make sure to have ESXi install onto the 240G boot drive and not the 1T:


Base Configure ESXi
Once ESXi has installed and booted up use the temporary DHCP IP address to log into the ESXi UI with your web browser (assuming you have DHCP setup, if not then use F2 to set one):


We will now base configure the ESXi host so that we are able to deploy a vCenter Server on to it since the only way to run vCenter is on ESXi.
To start go to Networking -> Port groups -> Add a port group:

Add a management port group for your management VLAN (105 in my case) that we will use to create a management VMkernel NIC next:

Next edited the existing “VM Network” port group to also have your management VLAN ID tagged so that when we deploy vCenter it will be able to talk on VLAN 105:

Next go to the VMkernel NICs tab and add a new VMkernel NIC for management:

Add the VMkernel to the VLAn 105 management port group you just created, set the management IP, and check off that it will be used for management under Services:

You can now log in using the permanent management IP on your management VLAN:

Once you have logged back in navigate to Storage, right click on the boot disk datastore, and rename it. I’m going to call it “esxi01-boot” to make more easily identifiable:
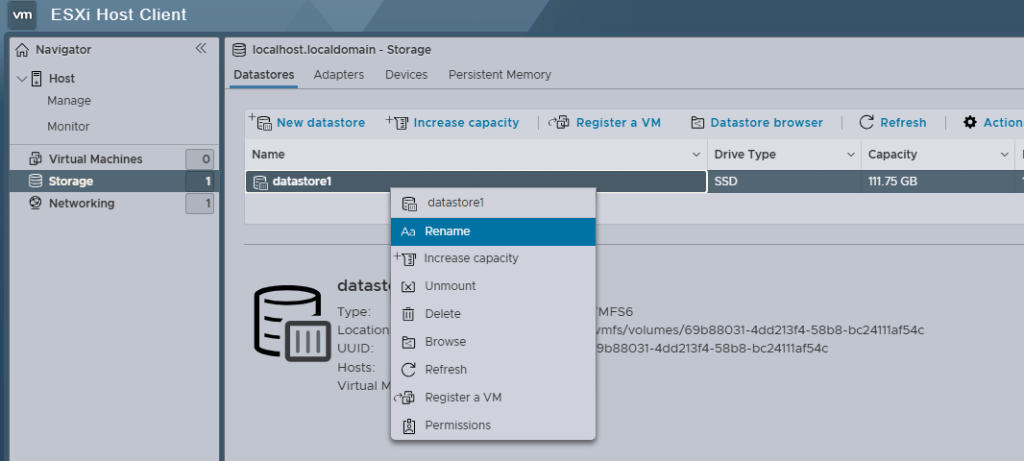
Next click New Datastore and create a datastore from the unused 1T disk. This will be where we will deploy vCenter, and I am going to call mine “esxi01-datastore01”:


Deploy vCenter
Now that we have the “VM Network” Port Group tagged with VLAN 105, and the local datastore created, its time to deploy vCenter using the vCenter ISO. Open it up on your Windows or Linux workstation and launch the installer:

Choose Install and put in your nested ESXi host as the target:

I’m going to call my vCenter “vcenter01”:

Since this is just a tiny nested lab to be a source for V2V migrations I am going to use the Tiny size for vCenter:

I’m going to store it in my “esxi01-datastore01” and enable Thin Disk Mode to save on space:

Put in all your network settings for your vCenter and then click Finish to have the installer deploy the vCenter VM:

Wait for the installer to deploy the VM and prompt you for Stage 2 of the installer which is configuring the VM:


I am going to setup my vCenter to sync NTP with the public NIST NTP servers since I dont have a lab NTP server, and I’m also going to enable SSH incase I need it later:

I’m going to use the default “vsphere.local” for the vCenter SSO:

Kick off the Stage 2 installation and wait for it to complete:


You can now log into the nested vCenter to continue setup:

Add ESXi Host to vCenter
After logging into vCenter start off by right clicking on vcenter01.lab.local and creating a New Datacenter named “lab”:

Next right click on lab and choose “Add Host” and put in your ESXi hostname:

Click through and use all the defaults and then click finish to import your ESXi host:

Once your ESXi host shows up click on it and navigate to Configure -> Time Configuration and add the same NTP servers you used for vCenter:


Next navigate to Services and use the Edit Startup Policy button to enable ESXi Shell and SSH to start at boot, and then enable them since you will likely want this functionality for a lab:


Add ESXi Host to a Virtual Distributed Switch
Since most of the time a production deployment is using a Virtual Distributed Switch instead of the default Standard Switch we will now create a single VDS name “lab-vds01” by navigating to the Datacenter network tab:

I’m creating the VDS without any port groups to start:

Once the VDS is created right click on it and go to its Settings:

Under Advanced enabled Jumbo Frames with MTU 9000:

Next right click on the VDS and create Distributed Port Groups for your management port group, vMotion port group, and VM port groups. For me that will be a port group for VLAN 105, VLAN 200, VLAN 300, and VLAN 400. Make sure to tag the VLAN on each port group when you create it:


Once completed your Distributed Port Groups should look something like this:

Now that we have the Distributed Port Groups right click on the VDS and select Add Hosts:

Select your ESXi host:

Set the first two NICs as the VDS uplinks:

Assign both the VMkernels to the VLAN 105 Distributed Port Group. I believe if you don’t move both over it will leave one of the NICs in the old standard switch:

Move the vCenter over as well to the VLAN 105 Distributed Port Group and Finish the Wizard:

Now go back to the ESXi hosts VMkernels page and delete the temporary DHCP one:

Now add a new VMkernel for vMotion to the vMotion port group and mark off vMotion and Provisioning for it:

It should look like this when you are done:

Finally go to Virtual Switches and Delete the old standard switch now that it is no longer in use:

Upload ISOs to ESXi Datastore
In order to create a Windows and Linux VM upload those ISOs to the esxi01-datastore01 from the Datastore Files section:


Create a Source Linux VM
Create a simple Linux VM with 2x vCPU, 8GB memory, 240G boot disk, and a NIC on VLAN 300:

Install the OS (I am using Minimal Install) and get the VM to the point that is can be logged into:

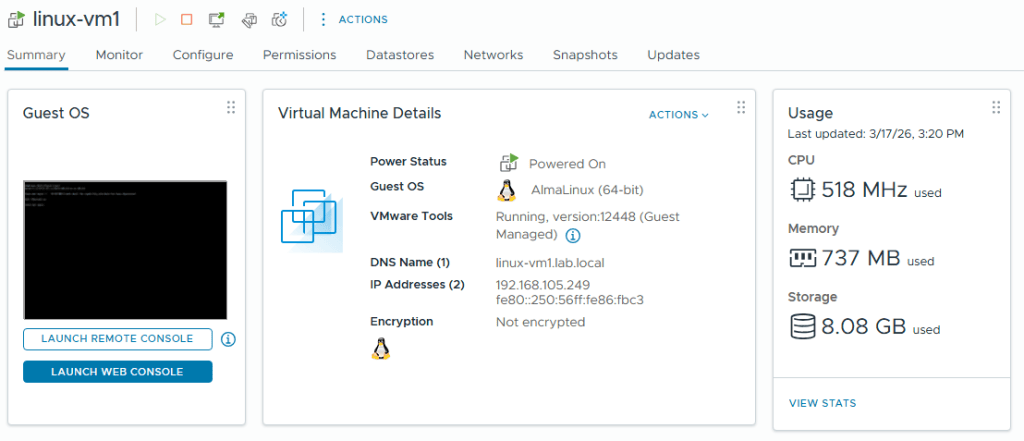
Once the install is complete the Linux VM is ready for V2V migrations later:
Create a Source Windows VM
Create a simple Windows VM with 2x vCPU, 8GB memory, 240G boot disk, and a NIC on VLAN 300 just like the Linux VM above and install Windows:

Once Windows is installed and you have logged into the VM for the first time make sure to install VMware tools:

Install VMware Tools from the CDROM that gets mounted up in Windows using the complete install and reboot once completed:

After VMware Tools is installed the Windows VM is now ready for V2V migrations later:

At this point we now have a nested ESXi environment with a vCenter, Linux VM, and Windows VM we can use for testing out V2V migration later. If you look close ESXi also reports its running on a PowerEdge server:

If you want to make it look a bit more like a production environment you can also just put the single ESXi node into a simple cluster with DRS enabled:

Leave a Reply